Business Unit Administrator Instructions
As the Business Unit Administrator (BU Admin), you manage the surveys for your business unit group. Business units tend to be a school district but can be any group of participants (school leaders responsible for their individual school’s culture survey, e.g., principals, heads of schools, assistant principals). As the BU Admin, you:
- Invite participants
- Define survey rules
- Search for participant records
- Manage and track your participants’ status
- Manage your business unit’s seats
- Deactivate or activate your participants
- Review your participants’ results
When you log in to the survey at https://buildingranks.nassp.org, your homepage defaults to the “Manage Participants” view (Figure 1). From this page, you will be able to: (1) invite new participants, (2) assign seats, (3) manage and track the status of your participants’ completion, and (4) review results. The action buttons throughout the platform are colored green.
To access this from other pages, click “Administration” in the course tab and select “Manage Participants” (Figure 2).
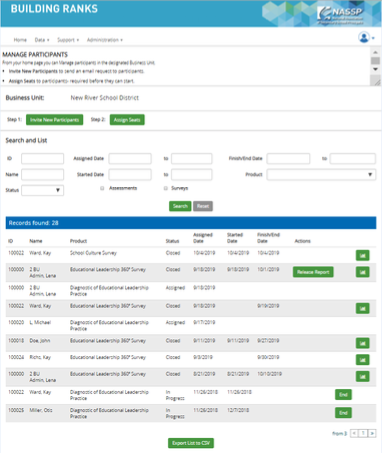
Figure 1: Manage participants
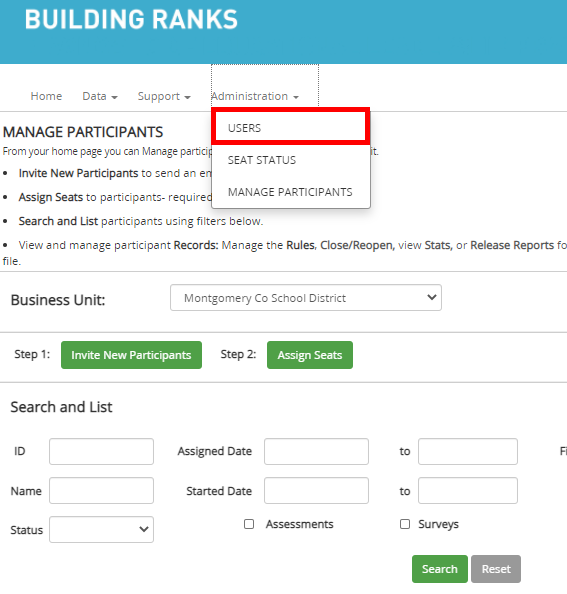
Figure 2: Accessing “Manage Participants” screen
I. Invite Participants
There are four steps to manage a school leader’s access to complete the survey.
- Verify or select your business unit group
- Invite new participants
- Verify (or modify) the invitation
- Send the invitation email
Step 1. Verify or Select Your Business Unit Group
To invite participants, you must verify or select your business unit group name (e.g., your school district). If you are associated with multiple business units, select the one from the drop-down list with whom you want the participant to be associated (Figure 3).
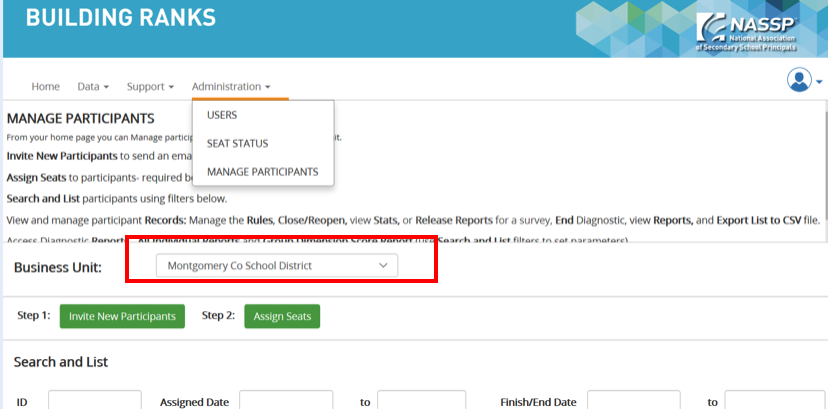
Figure 3: Verify and select business unit
Step 2. Invite New Participants
To invite school leaders to complete the survey, click the action button “Invite New Participants” (Figure 4).
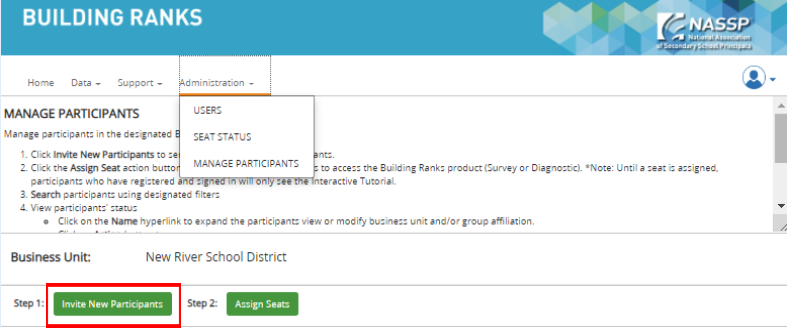
Figure 4: Invite new participants
Step 3. Verify (or Modify) Your Invitation
After clicking the “Invite New Participants” button, select your product (Subscription) and the screen will show the system-generated email. It can be modified by typing over the language provided. Do NOT delete the “Available data field” merge codes displayed as ${…}, e.g., ${groupAdmin} (see Figure 5).
After modifying and sending the message, it will default to the original language. Although you cannot save your changes, you can modify the language each time.
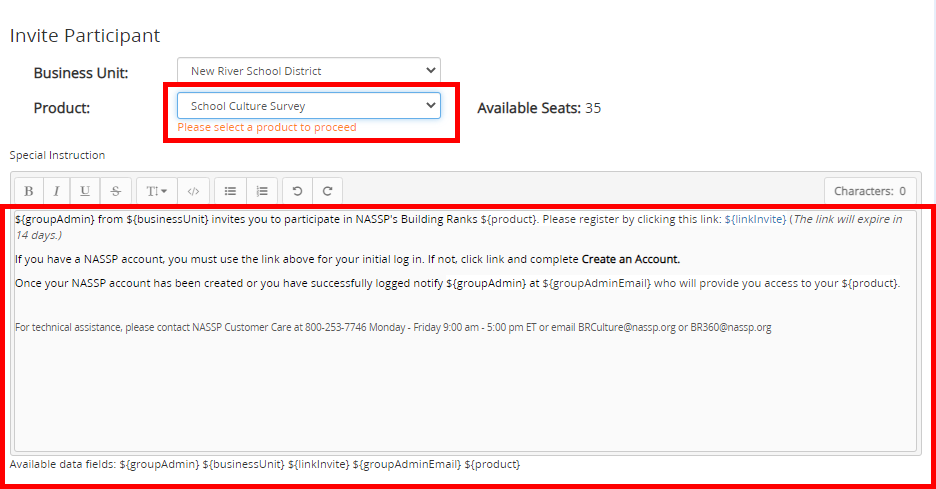
Figure 5: Invitation email
Step 4. Send the Invitation Email
In the email address field, you can either:
- Type each participant’s email address, separating them by comma, semicolon, space, or line break.
- Cut and paste the list of participant email addresses.
Once the email addresses are entered, click on the green Send Invite action button (Figure 6).

Figure 6: Invitation invitees
Important: Once your invitation has been sent, the school leader will receive a notification that they have been invited to complete the survey. The invitee must register and sign in to create their record.
II. Define Survey Rules
To Define survey rules (Figure 8).
Under the Manage Participant view, select the green Rules action button for the corresponding participant
- Specify the date when the survey will close. Checking the “Permission to update Close by date” box allows the participants you have invited to modify the date.
- You have the option to hold the reports if you would like to review them prior to the participants receiving them. If you select this option by checking the “Hold reports” box, you must release each report individually.
- To track the percentage of respondents by group, you can set the goal for each group. (To access the response progress during the period the survey is open, see Section VII).
- You can set system-generated reminders alerting the participant (school leader) that the survey will soon close, allowing the participant the opportunity to remind respondents to complete the survey.
- Save your selections and rules. (Figure 8).
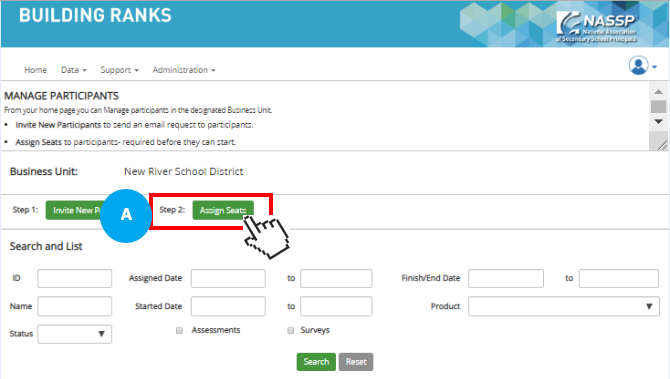
Figure 7: Assign seats
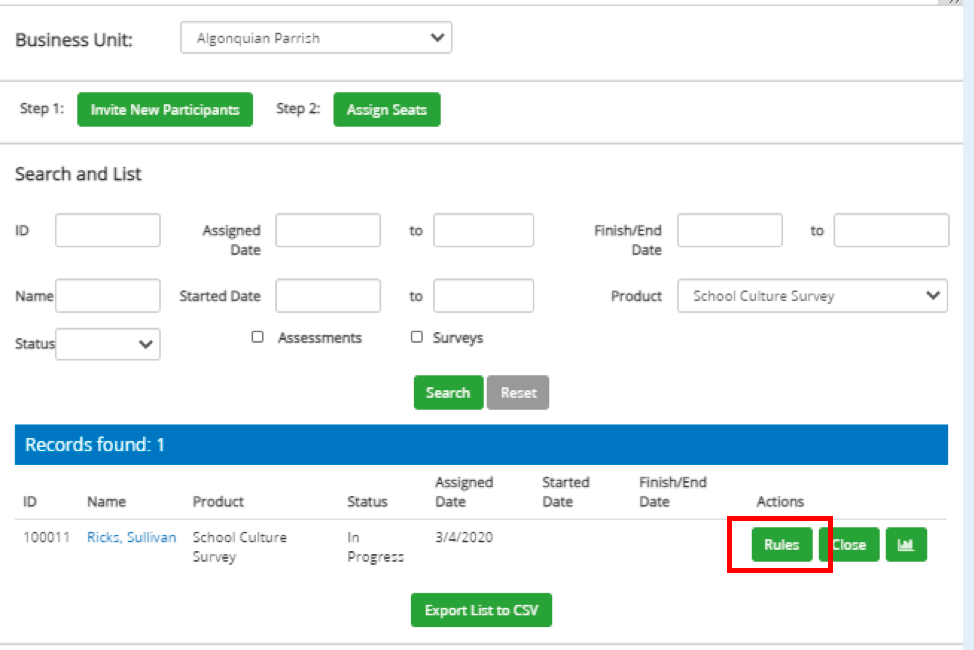
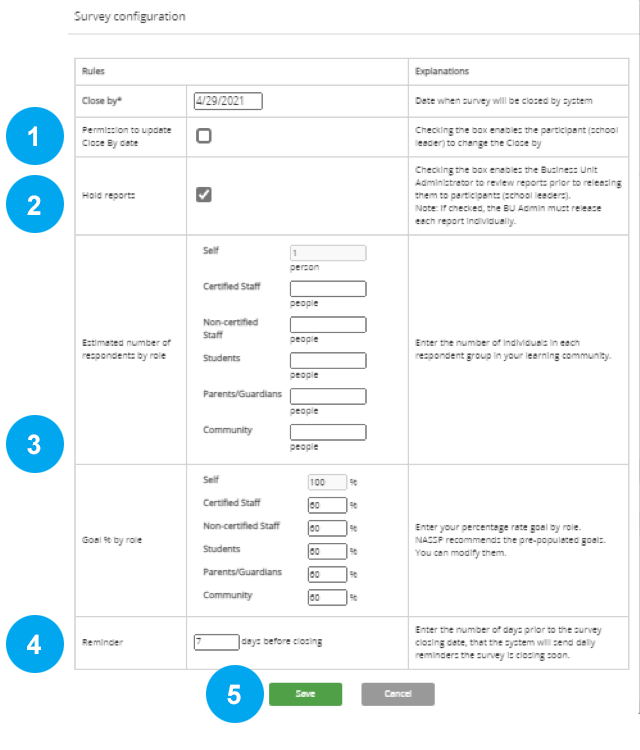
Figure 8: Invite users and set rules
III. Search for Participant Records
Searches can be made from both the “Manage Participants” and “User” screens (Figure 9 and Figure 10).
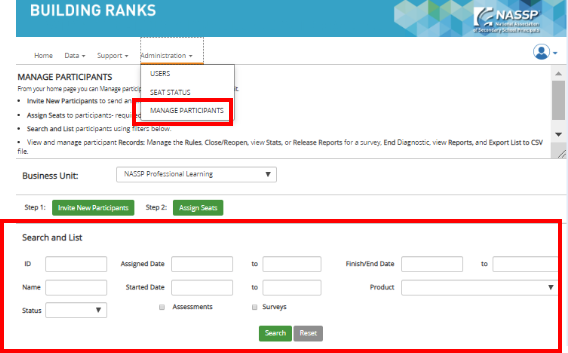
Figure 9: Search capability
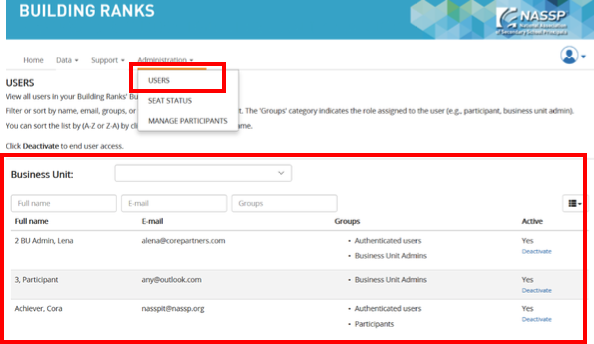
Figure 10: Invite users
IV. Manage and Track Your Participants’ Status
The bottom portion of the “Manage Participants” screen (Figure 11) provides:
- An overview of participant records:
- Status—whether the survey is in progress or closed.
- Assigned Date—the date you assigned the participant access to the survey.
- Started Date—the date the first respondent completed the survey.
- Finished/End Date—the date the survey was closed.
- Action buttons to manage your participants:
- Rules—a way to manage the Rules that govern survey data collection.
- Close—where you close a survey that is in-progress.
- Chart icon—provides either survey statistics when the status is in progress or the individual report when the survey is closed.
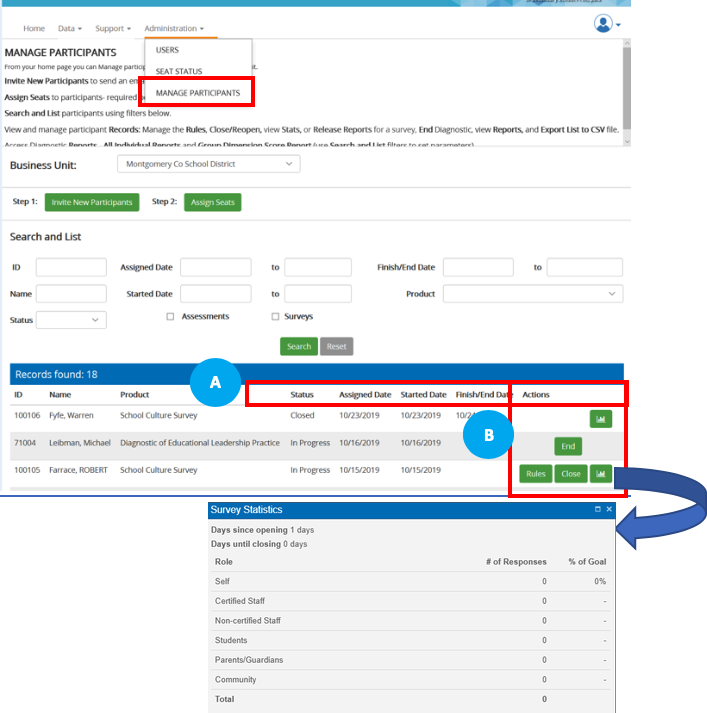
Figure 11: Manage participants’ records
V. Manage Your Business Unit’s Seats
To see the current status and history for your Business Unit’s seat purchases and usages, click “Seat Status” under “Administration” (Figure 12).
At the bottom of the screen, click the green “Seat Status Report” button to generate a PDF report that includes purchases, assigned seats, and used seats for each Building Ranks product.
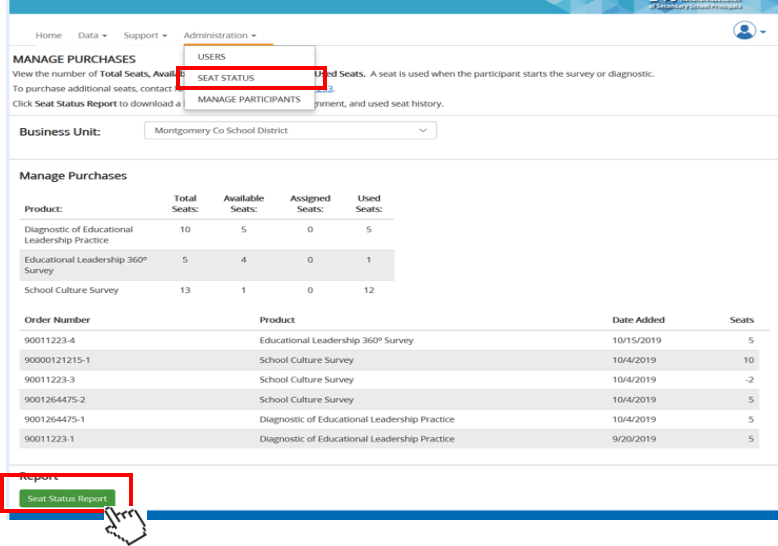
Figure 12: Seat status
VI. Deactivate or Activate Your Participants
To deactivate someone from the survey use the “User Screen” under “Administration” (Figure 13). There are two steps in the deactivation process:
- Search for the individual either by using the search function or scrolling.
- Click the deactivate link.
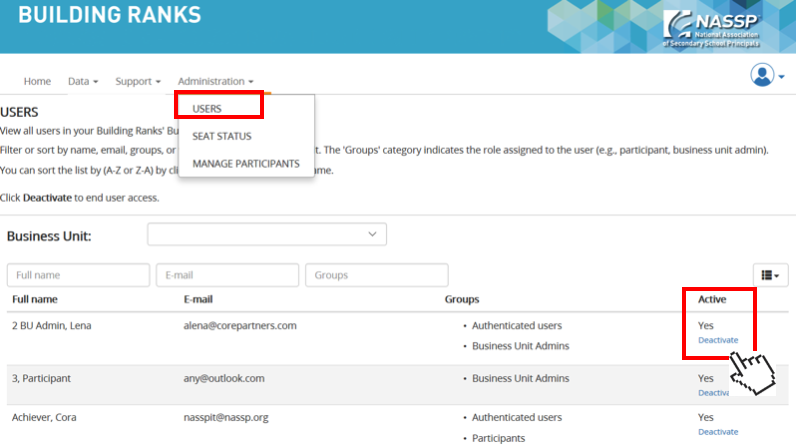
Figure 13: Deactivate or activate participants
In addition, this page provides the person’s email address, their role (group affiliation), and their status (active).
VII. Review Your Participants’ Results
Review results in two ways:
- Business Unit Analytics—a dynamic and interactive display of your participants with filters and drilldowns (Figure 14). (See School Culture Survey Analytics Instructions on the Support webpage.)
- Individual Report—the PDF report the participant receives (Figure 15).
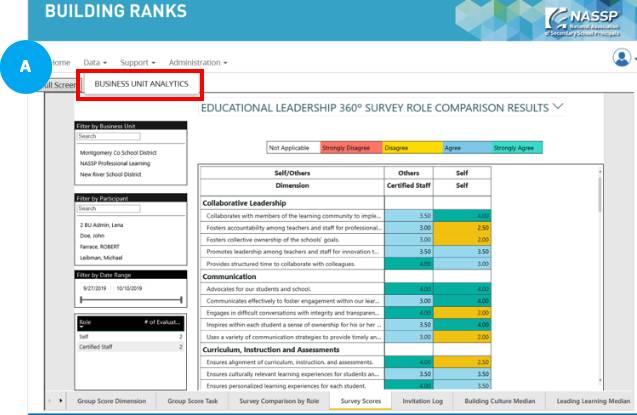
Figure 14: Business Unit Analytics
The individual reports are found on the “Manage Participants” screen. You can filter for the specific reports by using “Search and List.”
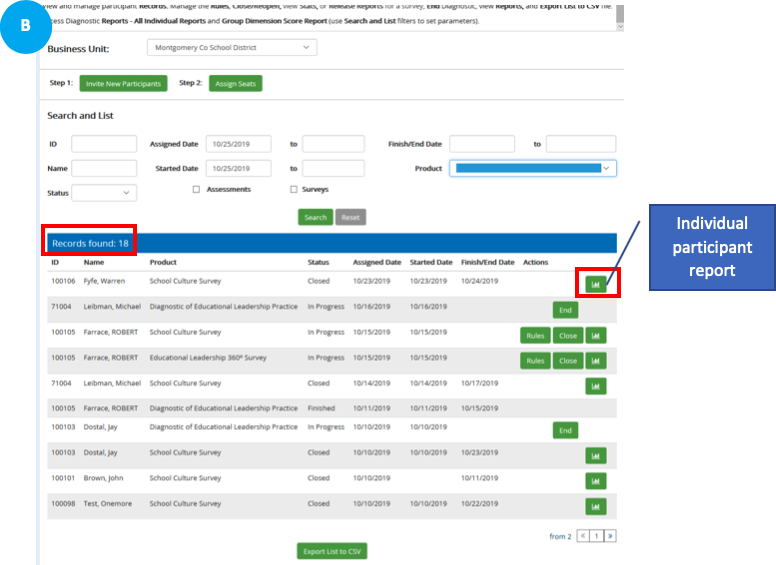
Figure 15: Individual PDF reports
Home
Home is the homepage for participants—those you invite.
Support
The support window provides PDF versions of relevant instructions, frequently asked questions, and NASSP contact information.
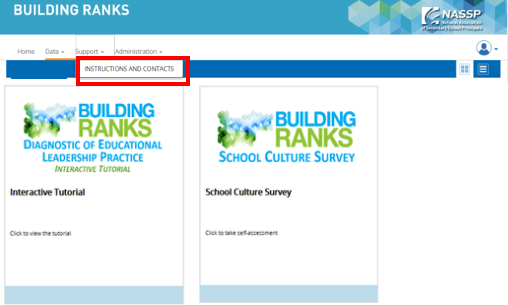
Figure 17: Support documents
